 Save
Save I discovered this creation at a friend's dinner party where someone had arranged cheese and cured meats into an actual building on the platter, and I couldn't stop staring at it—partly because it looked incredible, partly because it tasted even better than it looked. What started as curiosity about how it was built turned into me requesting the concept immediately, then spending an afternoon in my kitchen experimenting with different stacking techniques and arrangements. The first time I made it, I was nervous the whole thing would topple, but watching guests' faces light up when they realized they could actually eat this edible architecture made every nervous moment worth it. There's something magical about food that plays tricks on the eye before it plays tricks on the taste buds.
I remember setting this out for my partner's colleagues during a casual work gathering, and the moment people walked in, the chalet caught their attention before anything else on the table did. Someone literally asked if it was edible, and another person admitted they felt bad dismantling something so carefully constructed—then proceeded to eat half of it anyway. That's when I knew this recipe had something special: it bridges the gap between impressive and fun, between art and appetite.
Ingredients
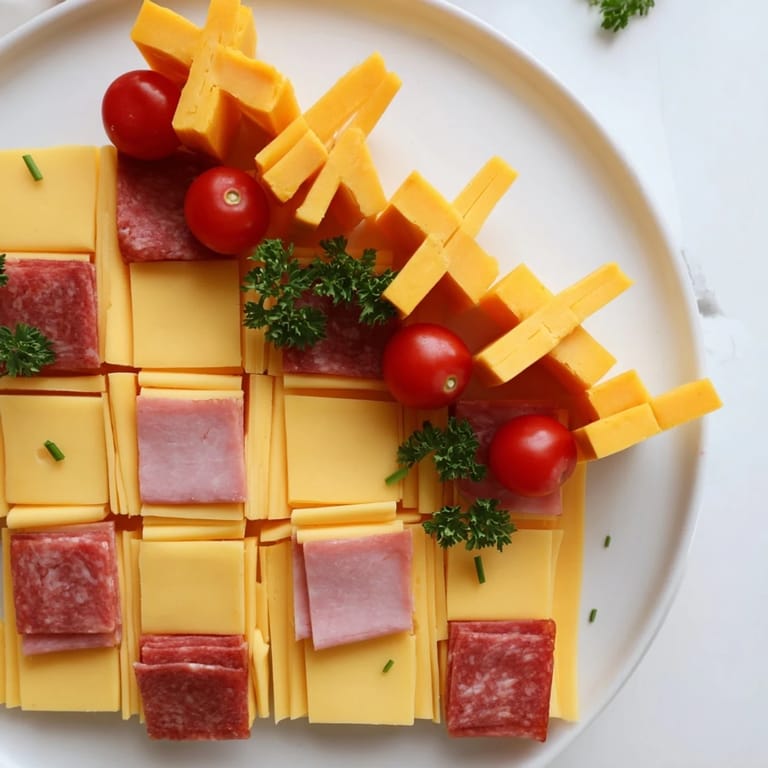
- Sharp cheddar cheese: Cut into 1.5 cm cubes and slices—the sharpness cuts through the richness of the meats and keeps your palate interested with each bite.
- Swiss cheese: Its mild, slightly nutty flavor and firm texture make it perfect for stacking without crumbling, plus the visual contrast with cheddar in the checkerboard is what makes people stop and look.
- Smoked ham: Cut into 1.5 cm cubes and slices—the smokiness adds depth, and ham's natural saltiness plays beautifully against the cheese's tang.
- Salami: Cut into 1.5 cm cubes and slices—choose a good quality one because its flavor and texture are front and center here, not hidden in a sauce.
- Fresh chives: Use 16 small ones for the roof beams—they add a subtle onion note and a touch of green that makes the whole thing feel less like a meat tower and more like an actual building.
- Cherry tomatoes: Halved and optional, but I never skip them because they add a burst of color and a tiny pop of freshness that balances the saltiness.
- Flat-leaf parsley: A small bunch tucked around the base acts like landscaping, softening the geometry and making it feel intentional rather than random.
- Toothpicks or short skewers: Eight of them—these are your invisible architecture, keeping everything stable without looking like you needed help.
Tired of Takeout? 🥡
Get 10 meals you can make faster than delivery arrives. Seriously.
One email. No spam. Unsubscribe anytime.
Instructions
- Cut everything to size:
- Measure out your 1.5 cm cubes and slices with intention—uniformity is what makes the checkerboard pattern actually look like a checkerboard. I use a ruler for the first few cuts, then my eye takes over.
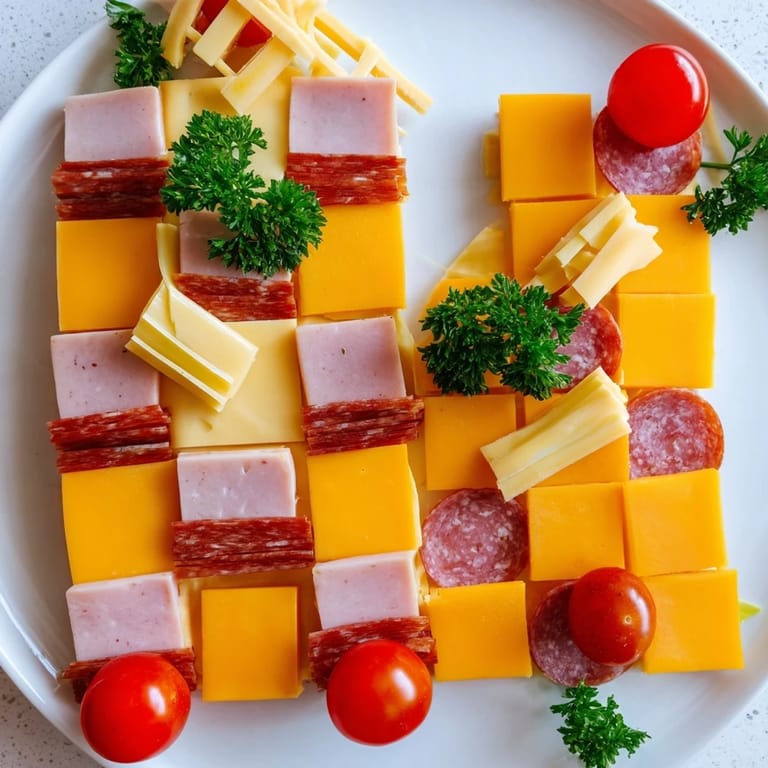
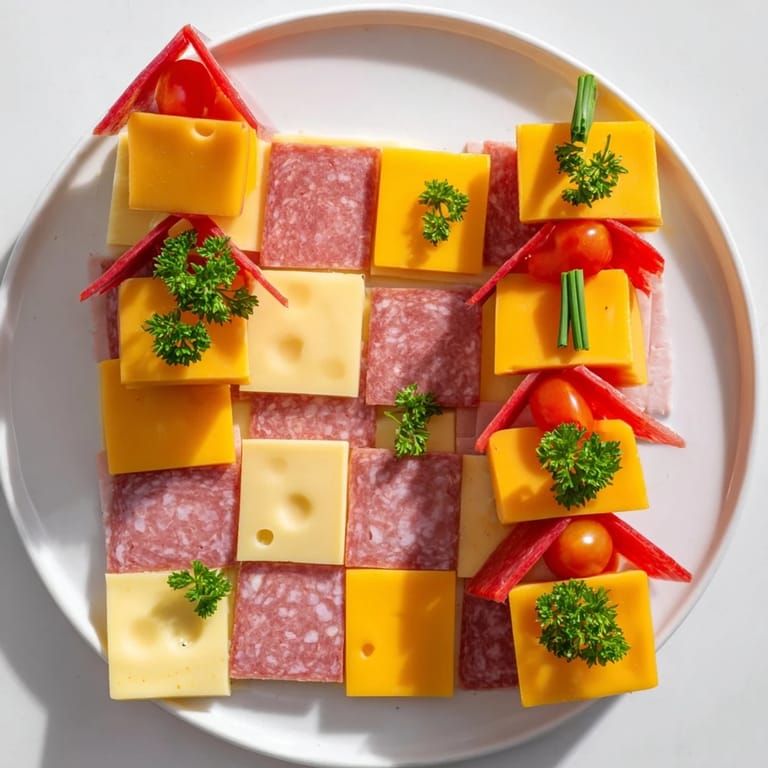
- Build the checkerboard base:
- Arrange cheese and meat slices on your serving platter in a tight 4x4 grid, alternating colors and types so the pattern reads clearly from across the room. This is your foundation, so spend a moment getting it right.
- Stack the chalet walls:
- Create a square footprint using four cubes per layer, alternating cheese and meat, and build up three to four layers high using toothpicks for stability if the stack feels wobbly. The toothpicks should be mostly hidden, supporting the structure without being obvious.
- Angle the roof:
- Position cheese slices or cubes at a peak on top, then secure chives along the angles to look like decorative roof beams. Step back and squint—if it reads as a building shape, you've nailed it.
- Add the garden:
- Tuck halved cherry tomatoes and parsley around the chalet's base to soften the edges and add color pops that make the whole thing feel less like a geometric exercise and more like a complete scene.
- Serve with ceremony:
- Set it out on the table with small forks or cocktail picks nearby, and watch people's reactions as they realize something so beautiful is actually meant to be eaten right now.
 Save
Save The moment I understood why this recipe matters was when a shy guest at my table suddenly volunteered to help me place the final chives on the roof, and we ended up laughing because one kept sliding off. That small moment of collaboration, of creating something together rather than just serving something finished, changed how I think about appetizers entirely. It's not just about feeding people—it's about giving them permission to play with their food again.
Choosing Your Cheese and Meat Pairings
Sharp cheddar and Swiss are my go-to because their flavors are distinct enough that you taste the difference in each bite, but you can absolutely swap in Gouda for earthiness, pepper jack for heat, or even smoked Gruyère if you want everything to taste like it came from the same Alpine vacation. For meat, I've experimented with turkey breast instead of ham when I wanted something lighter, and prosciutto instead of salami when I was feeling fancier. The rule I follow is: make sure each ingredient can stand on its own and has a personality, because in an appetizer this simple, everything is visible.
Presentation Tricks That Actually Work
The checkerboard base is doing half the visual work before anyone even notices the chalet, so don't rush it—take an extra minute to make sure your grid is tight and your alternation is clear. For the roof, angling those slices is easier if you slightly overlap them, and the chives held in place with a toothpick look intentional rather than precarious. I've learned that a serving platter that's darker in color makes the cheese and meats pop more dramatically, and leaving some breathing room around the chalet (rather than crowding it with garnish) lets people actually see what you've built.
- Use a large platter so guests have room to approach from multiple angles and grab pieces without the whole structure collapsing.
- Position the chalet slightly off-center so the checkerboard base doesn't feel like an afterthought.
- If something slides or tilts during service, it adds character—this is food, not furniture.
Wine Pairings and Serving Notes
A crisp white wine like Sauvignon Blanc or Pinot Grigio cuts through the saltiness of the cured meats and brings out the nuttiness in the Swiss cheese, making every bite feel less heavy than it actually is. Sparkling beverages work equally well because the bubbles act like a palate cleanser between bites. I've also served this alongside some crusty bread and cornichons, not because the chalet needs accompaniment, but because having something to build tiny open-faced sandwiches with turns it into an interactive experience rather than just standing around eating cheese.
 Save
Save Every time I make this, I'm reminded that the most impressive dishes are often the ones that require no heat, no complicated technique, and nothing but good ingredients and a little bit of playfulness. The Checkerboard Chalet proves you don't need a fancy kitchen or years of training to create something that makes people genuinely excited about eating.
Recipe FAQs
- → What cheeses work best for the checkerboard base?
Sharp cheddar and Swiss cheese create a flavorful and firm texture ideal for slicing into cubes and slices, ensuring a neat checkerboard pattern.
- → How do I ensure stability when stacking the chalet?
Use toothpicks or short skewers to secure alternating cheese and meat cubes, especially when building multiple layers for the chalet structure.
- → Can I substitute the meats used in this arrangement?
Yes, alternatives like turkey breast or prosciutto can be used if preferred, maintaining similar cube sizes for consistency.
- → What garnishes enhance the chalet appearance?
Fresh chives act as beams or logs for the roof, while halved cherry tomatoes and flat-leaf parsley add color and mimic garden elements around the chalet.
- → Is this dish suitable for guests with dietary restrictions?
It caters to gluten-free and low-carb diets; however, it contains dairy and pork, so be mindful of allergies or restrictions.